We know that great content comes from great authors, and we're looking closely at ways this markup could help us highlight authors and rank search results.Google Authorship has been around for a fair while now and with growing speculation about whether AuthorRank will be incorporated in Google's algorithm next, you need to make sure you have it set up properly for your website. Aside from being speculated to inform the next algorithm update, Authorship can provide other benefits such as increased CTR (as it helps you to dominate the SERPs page) and can help people to identify with you or your brand as they keep seeing your face alongside the content.
Google Author Rank
The Authorship Process
What you need to know is that Google needs to complete a circuit of verified trust between it and an author's published content. For you to participate in this program, you need to have two things:- A verified digital identify owned by Google that links to your published content (a Google+ profile)
- Your published content needs to reference you as the author and link back to the verified digital identity
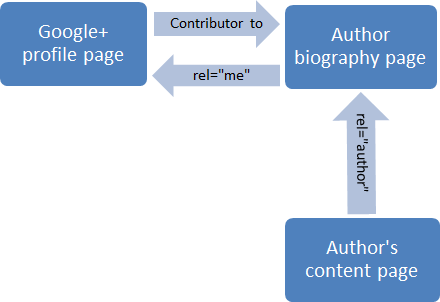
- 3-Link Method. The 3-link method is used with sites that host content pages that link to an author biography page on the same domain. All of the content pages link to the author biography page, the author biography page links to the author's Google+ profile, and the Google+ profile links to the author biography page, as shown below:
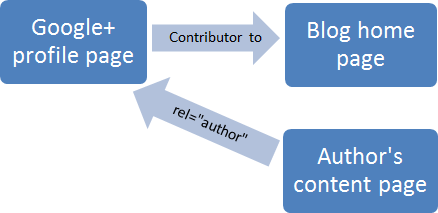
- 2-Link Method.The 2-link method is for content pages that do not link to an author biography page. Instead, they typically contain a mini author biography snippet at the bottom of each post. These posts link directly to the author's Google+ profile, and the Google+ profile links to the home page of the publishing site, as illustrated below:
- Email Verification Method. The email verification method can be used when the author does not have control over author biography content anywhere in the content page (but its use is not limited to that scenario). In that case, an author byline links to an email address using the same domain name as the content page, and that email address is registered and verified in the author's Google+ profile, as shown below:

How to set up Authorship
- Create a new Google+ profile or use your existing profile.
- Think carefully about your photo – a headshot will work best and it is a good idea to keep the same photo across all channels (Twitter, LinkedIn) so that people recognise the photo when it appears alongside your posts in SERPs which can help to increase CTR.
- Click Continue until Finish appears, and then click Finish.
- Click Continue to Google+, click Profile, and then click Edit Profile.
- Make sure your profile is visible to the public. Click the profile discovery box and ensure that "help others discover my profile in search engines" is checked, and then click save.

- Click +1's, select the Show this tab on your profile checkbox, and then click Save.
- Click About, click Other profiles, click Add custom link, and then add labels and URLs for each of your other social media account profiles, such as Facebook, Twitter, LinkedIn, Quora, etc. Click Save when done.
- You may optionally complete the sections about your occupation, employment, and other pertinent information pertaining to your areas of expertise. While these ancillary elements are not required for authorship markup, they can often contribute an added degree of credibility to an author, which builds up your reputation as an authoritative source on the topics you cover.
- When you are done completing your Google+ profile, be sure to click Done editing to save all of your changes.
- Copy the 21-digit ID number used in the URL of your Google+ profile. You'll likely need it momentarily.
Setup Your Published Content Pages For Authorship Markup
Which steps you'll take to set up your content pages and finish configuring your Google+ profile depends on whether you'll be registering content pages using the 3-link method, the 2-link method, or the email verification method (which depends upon how your Web content was published). You may end up using several methods if you publish content on multiple sites (but only one method is needed per site). Pick and choose the sections below that apply to your situation.3-link Method On Sites Using Author Biography Pages
Assumptions for this method:- The author biography page is located in the same website domain as the content pages that link to it.
- Each content page link to the author biography page includes the author's name in the anchor text.
- You have access permission rights to make source code edits on these pages.
- On the author biography page, add a link for the author's Google+ profile using the anchor text "Google+" (omit the quotes).
- In the anchor tag code for the Google+ link, add the anchor tag attribute rel="me". The following is an example of such tag source code (be sure to use your own 21-digit, Google+ profile ID number):
<a href="https://plus.google.com/111111111111111111111" rel="me">Google+</a>
- In each content page, edit the existing link to the author biography page by adding the anchor tag attribute rel="author". The following is an example of such tag source code (be sure to use the URL to your author biography page in the href attribute as well as your name as the anchor text):
<a href="AuthorBiographyPageURL" rel="author">Author Name</a>
- In your Google+ profile, click Edit Profile, and then click Other Profiles.
- Click Add custom link, and then add a label and the full URL for the author biography page.
- Click Save when done, and then click Done editing.
2-link Method On Sites Using Author Bio Snippets At End Of Each Post
Assumptions for this method:- Each content page contains a boilerplate author biography sentence or paragraph snippet that contains a link to the author's Google+ profile.
- You have access permission rights to edit the author biography text snippet.
- In the author biography snippet, add a link to the author's Google+ profile using the anchor text "Google+" (omit the quotes). The following is an example of such tag source code (be sure to use your own 21-digit, Google+ profile ID number):
<a href="https://plus.google.com/111111111111111111111?rel=author">Google+</a>
- In your Google+ profile, click Edit Profile, and then click Contributor to.
- Click Add custom link, and then add a label and the full URL for the publishing site's home page.
- Click Save when done, and then click Done editing.
Email Verification Method
This method is very helpful to authors on sites in which they can't edit any anchor tag code, but its use is not limited to that scenario. As long as its criteria are met, email verification can be the primary method used for establishing authorship verification. Assumptions for this section:- The content page must include an author byline that starts with the word "By " followed by the exact same author name used in the Google+ profile.
- The author name is linked to an email address that uses the same domain name as the site hosting the content.
- Browse to the Google+ page Link your Google+ profile to the content you create (you must sign in to your Google account to complete this procedure).
- Type or paste the email address used in your content's byline link into the Step 4 text box, and then click Signup for Authorship.
- Look for a verification email from Google sent to that email address. Once received, click the link within the email to verify you own the email address. Google will then automatically add the verified email address to the Work section of your Google+ profile. It will also add a link to the domain name used in the email address in the profile's Contributor to section.
WordPress Sites Require Additional Configuration Work
Ensure you have a byline on each page of content with the same name as your Google+ page, e.g. 'By Hitesh Kumar'. By default, WordPress strips out all of the "rel=xxx" anchor tag attributes used in Google authorship markup. As of this writing, there are a number of WordPress plugin solutions that override this limitation. However, they typically remove more than just the rel=xxx anchor tag attribute limitations in links. You may need to determine how to enable author biography snippets in your theme. Some themes use the content written in the user profile Biographical info text box, whereas others allow author information to be added as posts are written in the WordPress editor. Check your theme's documentation for its specific implementation.WordPress & The 2-link Method: Author Biography Snippets On Each Post
A number of WordPress themes enable authors to create custom biography snippets in their WordPress User Profiles, which are shown at the bottom of each post. For themes that don't support this feature, site administrators can add this specific feature with the WordPress plugin WP Biographia. By including a link to the author's Google+ profile using rel=author code in the biographical snippet in each post, no author biography page is needed, eliminating the need for rel=me code. Follow these steps to make this 2-link method work:- Log in to the WordPress site.
- From the Dashboard, click Users, and then click Your Profile.
- Scroll down to the About Yourself section. the Biographical Info box, add a few brief lines of text to serve as your online biography snippet, then add a link to your Google+ profile using the anchor text "Google+" (omit the quotes). The following is an example of the tag source code (be sure to use your own 21-digit ID number):
<a href="https://plus.google.com/111111111111111111111?rel=author">Google+</a>

What if my brand doesn't have an 'author'?
Personally, I think it's always best to have a face associated with the content, however if your brand really doesn't have any personal profiles that it can associate with the content there is the rel=publisher tag which attempts to overcome this. The rel=publisher tag will link your brand's website with its Google+ business page and therefore again in theory pull through to the SERPs. The reason I say in theory is because over the past few weeks the rel=publisher tag seems to be showing up less and less in SERPs it seems.How to implement it:
The steps are very similar to the Authorship steps with just a slight change to the code. 1. Add this code to your homepage<a href="https://plus.google.com/[yourpageID]" rel="publisher">Find us on Google+</a> Obviously replace [yourpageID] with your G+ page which you can find in the URL for the page. 2. Add your website URL to your Google+ page, so on your G+ page click 'Edit Profile' then 'Website' and then enter the URL exactly as it appears on the page you added the code to. 3. Again, test whether it is working using Google's structured data testing tool so here's an example for t4techno: 
How to know if it's working
Google has a number of tools which help you to assess whether your Authorship is working and driving traffic to your site, however these do seem underutilised at times. First of all, in Webmaster Tools under 'Labs' there is 'Author Stats' where you can see all of the pages with authorship set up that have been appearing in SERPs, impressions, clicks, CTR and Average position as can be seen here with an example of one of my colleague's blogs:
Author Stats
 This then shows a similar kind of breakdown as in Webmaster tools of impressions, clicks and CTR. It is currently in testing by Google so only available to a small group of authors but will hopefully be rolled out soon.
 In Summary
That's Google Authorship Markup in a nutshell. One huge, complicated nutshell, filled with caveats. But given Google's active pursuit of verifiable, trusted expert content to improve the quality of their search results, author rank will only increase in importance as this technology becomes more widely adopted. And as that happens, well-configured author pages containing consistent, valuable content will likely see even greater lift over time, and any existing author rank may well influence the ranking of new content on the same topic produced by that established author. Ultimately, Google's desire to identify high-quality sources of original, expert content is a good thing for content authors. You won't be lost without it, but you may benefit from taking the time to work out the configuration details of implementing Google Authorship Markup on your website or blog.Read more...
No comments:
Post a Comment